I realize that Valentine's Day has come and gone, but I am a slowpoke and just finished my Valentine's Day gift for my boyfriend today!
Before I begin, let me just say that I am really interested in crafting. I am interested in ideas and buying all the things I will need. I am also interested in beginning projects. After that... not so much. My cousins, Kelley and Lisa, can attest to this. I have so much stuff sitting around that I NEEDED for whatever reason. Sigh.
But I actually finished something, so go me!
This is the love jar! I wrote out 30ish nice things about my boyfriend, printed them out, and folded little fortune cookies to house them. I got this idea from Chrissy and then when I looked up "love jars" on Google, I saw the fortune cookies and I just HAD to do it. I have had all the stuff for a week and just now I did it. Story of my life.
I sort of followed the directions I found at Better Way Moms but I am way more lazy than that person so I adapted the directions to fit my needs and maybe yours! I made my own step by step pictures if you are interested!
1. I traced my circles. I used 12x12 scrapbook paper. I used a CD to make 2 big circles on each paper and then I used a cup to trace 4-5 small circles which were about 3.25 inches in diameter.
2. Then I ripped off a strip of double-sided tape. No specific size... I sort of used the premarked lines on the tape to guide me but I was not religious about this. I cut it in half lengthwise. In the picture you can see that I put the two pieces of tape on the top part of the wrong side of the circle. I folded one of my little messages in half and laid it in there.
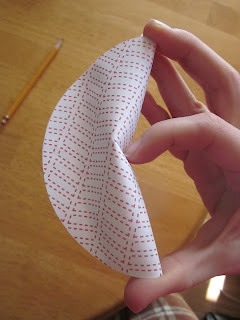
3. I had the sticky side and unsticky side meet. I did not crease at all.
4. Then, like so, I held two fingers on either side and just shoved the middle in. Other places told me to make a crease so I could tell where the middle was. I just winged it (wung it?). I think the imperfections will make it special.... haha.
5. Then you will have a little fortune cookie! This one actually looks pretty good but believe me, most of them were off centered and one side was bigger than the other. Whatevs.
6. However, it will not stay fortune cookie-like unless you stick it together. I tore off a tinier piece of double-sided tape and stuck it close to the fold on the bottom part. I don't think you can see it in this picture. But it is there!
7. Then I held it together. I didn't crunch it or crush it together... I just held it together and looked at Pinterest for a minute. Haha!
And that's it!! It was actually pretty easy and semi-fun once I got started. You could use this for many purposes! Birthday gifts, anniversary, you know.
So far they are sticking together... nothing is popping apart or anything! Good old double-sided tape. If you choose to do this, you might want to cut some practice ones. My brother and I played around with them and I got super frustrated for a while when they didn't look perfect. Then I let go and now I am happy!


Jill, I did something similar with my class, but I LOVE your cute paper. Plus I love that you made a jarful of sweet messages. My students only made two Valentine fortune cookies each. Hmmm ... maybe next year we will use your cute paper idea and give our parents a whole jar of Valentine wishes. OR maybe we could do this for Mother's Day!!!! Thank you for the inspiration!
ReplyDeleteCamille
An Open Door
P.S. So did your boyfriend love it?????? He better have!!!
I actually haven't given it to him yet!! He reads my blog sometimes so I hope he doesn't think to read it today... haha! But I will keep you posted. :)
DeleteWhat a cute idea! BTW I understand how you fizzle out on projects - I have so many half finished knitting projects it's embarrassing!
ReplyDeleteLaura
Mrs. Castro's Class 2nd Grade...Spanglish Style
Jill,
ReplyDeleteI finally wrote a post about Valentine's Day in my class. Since we made paper Valentine fortune cookies, I gave a shoutout to you so teachers could see how much cuter it could be! http://camillesopendoor.blogspot.com/2012/02/belated-valentines-day-post.html
Camille
An Open Door
WOW - I LOVE the cookies! What a great way to snazz it up! What's funny is that I also bought my hunnybun chocolate-covered fortune cookies for Valentine's Day - isn't that a weird coincidence?
ReplyDeleteIt turned out really nice.
Buzzing with Ms. B
So cute!!! I love this idea and may steal it. Thanks for sharing!!
ReplyDeleteThis is an adorable idea and they look perfect!!!
ReplyDeleteAmy
The Crazy Adventures of a University Graduate
I love this!!!!! Thanks for sharing!!! :) Your boyfriend is LUCKY!
ReplyDeleteA Teeny Tiny Teacher
This is such a great idea- thanks for sharing! I will definitely be Pinning this for my hubby's b-day!
ReplyDelete-Mrs. Thompson
Adventures in Teaching