Showing posts with label tutorial. Show all posts

Monday, June 25, 2012

Monday Made It: Pocket Chart Stand

I'm so happy for Monday Made It because it makes Monday so much more wonderful!
This week, I made a mini pocket chart stand for my $1 pocket charts I got last summer at Target. I was inspired by Carly at First Grade Fabulosity's post about her pocket charts!
It was crazy easy! Here is how you do it!

First, you'll need to gather your supplies:
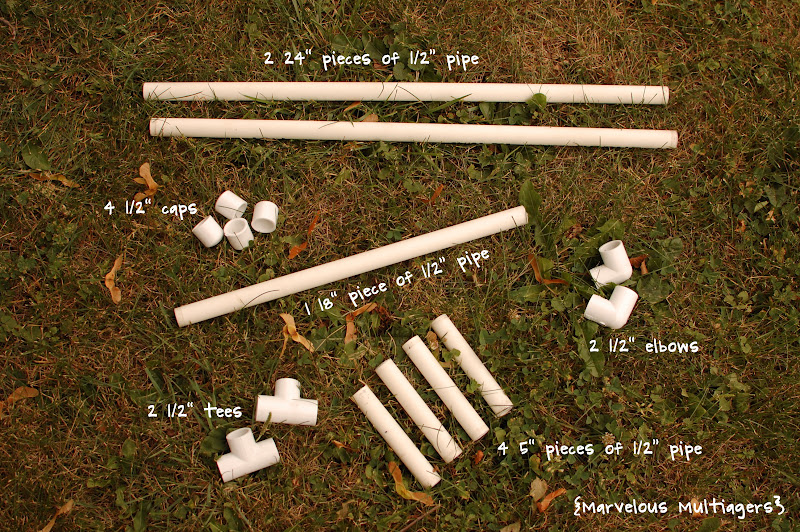
Side note: my pipe is already cut in this picture, obvi. You will need to buy a 10' piece of 1/2" PVC pipe at your preferred hardware store. :) It will cost you about $1.50 for the 10' pipe.

Then, start putting it together!

First, put your two elbows on either side of your 18" piece. This will be the top of your stand.
Then, put your 24" pieces in the other ends of the elbows. Just shove 'em in there!
After that, put your tees on ends of your 24" pieces.
Next, put one 5" piece in each tee opening.
Last, put your little caps on the open ends!
Then it should look like this bad boy. Feel free to relax at this point, as that is what I am clearly doing in this picture, haha!
Now if you would like to, you can spray paint your stand. I had some spray paint already so we painted it navy blue! Also, I have metal rings that I am going to use to hang the pocket charts but they are at school, so for the purpose of this post, I just tied the pocket charts up with yarn!
If you already have the pocket charts, this project will cost you less than $5 to make one stand. That is a pretty good deal to me!!!

There are two pocket charts back to back on the stand so two students can use the chart simultaneously!

I'm planning to use this as a station during reading time. Our first grade program features 3-4 word families per unit, so I'm going to make up little cards so they can make words independently using the word families.

Do you have any other ideas or ways we can use this awesome stand during independent work time?

Friday, June 15, 2012

Cassettes into CDs Tutorial

Did you know that you can make a cassette tape into a CD??

Does anybody even have cassettes anymore...? Haha!

So I am working on building up a listening area for next year. Whether or not I can make Daily Five work for me, I definitely need a listening area so my chillins don't go off the deep end during reading time. :)

Anyway, I have found or acquired a number of books on tape, but I didn't think I really wanted to have to deal with the kids rewinding tapes or pulling all the tape out. This past year they all did fine with CDs when we would listen to our Reader stories, so I wanted to make my tapes into CDs, and my brother helped me figure out how to do it!

Here's what you need!
You can also use a tape player if you have one in your CD player! It just takes up less room if you do it this way. :) I got my auxiliary cable at Meijer for like $10; you can find them in the electronics area!

First, download and install the Audacity software. It is free and safe!
Then plug one end of your auxiliary cable into the headphone area of your Walkman or tape player and plug the other end into the microphone part of your computer.
Open up Audacity, hit play on your Walkman, then hit record on Audacity!
When you have recorded your whole tape, push stop. Then, click on File and then Export...
It should automatically come up to save as a WAV file. Name it whatever you want. I saved mine to my desktop. Then I added it to Itunes and burned it to a CD! Done and done.

I don't know if anyone will be able to use this little tutorial, but if you need it then hooray! Let me know if anything is unclear. :)

I'm off to find more books on tape!!! Happy Friday!
Related Posts Plugin for WordPress, Blogger...