Showing posts with label DIY. Show all posts

Monday, August 6, 2012

Monday Made It: Fabric Napkin Art

I'm coming to you LATE for Monday Made It! I usually have these pre-typed up on Sunday nights but I was a busy lady, so here we go now!
Today I only have a home Monday Made It, which is weird for me because at the beginning of the summer, I didn't think I'd ever have one. 

BUT, I am moving out next week! And my new apartment has super super boring walls and I need some snazzy things to hang up.

So I made some fabric napkin art!
I was inspired by Kate at The Small Things Blog. She has a pretty good tutorial up there, so I didn't make a new one. But here are my little tricks and tips:
  • I bought my fabric napkins at World Market. Don't even think about going anywhere else. World Market has TONS of awesome patterned napkins and they are reasonably priced! I found these in the clearance section at $1.98 each, and I bought 3 identical napkins. I just featured different parts of the napkin in each frame!
  • My sweet square frames came from Dollar Tree and they were $0.50!!!! They are metal, not wood like Kate's, but I am on a budget here people! They were originally frames to hold 5 tiny pictures but I just threw out the little insert thing.
  • After I decided which part of the napkin I wanted to show, I cut around it with an additional 2 inch border. I wrapped the napkin around the cardboard backing and then hot glued the edges to the back (remember, I love hot glue!!). I did take a picture of that part to show you... it's a little dark.
  • In the end I just shoved it back into the frame. The kind I had was the kind where you slide the backing into the bottom. With the napkin glued it just barely fit so I had to use all my might. :)
So there you have it! 

You could totally use this in the classroom. It would be cheap if you just used scrapbook paper or a school-themed fabric... or a printed fabric to match your classroom theme!

And as a special treat, here are my cousins and me last night during Pinterest crafting!!!
Hope your Monday was fantastic!!!

Monday, July 30, 2012

Monday Made It: Bead Slides

It's Monday! Two more days until I can get back into school to start setting up and I am SO PUMPED! Also I'm excited because it is Monday Made It day again!
This Monday, I made bead slides to use for phonemic awareness activities!
I read about bead slides from Katie at Two Can Do It who originally read about it from Julie at Make, Take & Teach!

You use bead slides to help students learn how to segment phonemes. As you may know, phonemic awareness is important because children's level of phonemic awareness is highly correlated with their success in beginning reading! (I feel like I should put an in-text citation here, haha.) Anyway, when you're asking a student to segment phonemes, you would give them a word like "book." If they are comfortable with this skill, they would be able to tell you that the sounds in book are: b-oo-k. 3 sounds - 3 phonemes!

Bead slides just give students extra kinesthetic support so they can build this SUPER IMPORTANT skill!  They move a bead with each sound that they say.

Anyway, let me tell you how to make them. :)
You'll need...
  • regular flat shoelaces. I bought 54" shoelaces from Target. They were about $2 a pack, and I was able to make 12 bead slides using one pack of shoelaces (6 on each lace).
  • beads. I got mine at Hobby Lobby for about $2.50. You could actually use pony beads if you want, you just want to make sure that the holes aren't too big so there is some resistance when you move the  beads up and down the shoelace.
Then you're ready to start!

You'll want to put groups of 6 beads onto the shoelaces and tie off about 5-6" inch sections for each bead slide. Here's a picture to show you what I mean.
After you have put on your beads and tied off each section, cut in between the knots and you will have your bead slides!

If you use Michael Heggerty's phonemic awareness book, you could absolutely use these for the segmenting and blending portions of the daily routines!

Julie at Make, Take & Teach has a video about bead slides as well as extra resources to use these! :)

Bead slides are fun to play with, too, so if you don't teach phoneme segmentation, you could easily use these as fidgets in your classroom!

Monday, July 23, 2012

Monday Made It: Crate and Drawer Storage

Hi friends! Happy Monday!
My Monday Made It is a little......... unfinished-looking today. Also my title for this project is not good... I think you'll understand what I mean though. :)

This week I made a crate and fabric drawer and shelf storage thingy for my class!
I was inspired by Stephanie at 3rd Grade Thoughts! Like her, I have an awkward space underneath my whiteboard in my room. This year it was occupied by my Even and Odd Street...
but next year I want to use the space productively. I don't have any in-classroom storage whatsoever. No built-in cabinets, no shelves, nothing. So this will give me some space to store things for Daily Five or whatevs.

The supplies were easy to get! I bought 4 crates at Target (they're on sale right now for $3!), I bought the fabric drawers at Aldi (2 for $5.99! WOW!), and I got the board at Menard's (it was around $7 or so in the lumber section of the store). The board measures... 1" by 12" by 72"... 1 inch thick, 12 inches wide, and 72 inches long. Or 6 feet, however you want to say it.

The crates are ziptied together. I haven't officially attached the board yet because I don't think I could get this contraption into my car if I did. :)

My random baskets are to show what will be there! I plan to buy legit baskets to put my little chalkboards in and my whisper phones and all that jazz.

The drawers will have my Listen to Reading materials, perhaps my Word Work materials, stuffed animals for the kids to read aloud to, and so on!

I am excited about this new storage option in my class!

Monday, July 16, 2012

Monday Made It: Whisper Phones

Happy Monday! I had a great weekend, and I hope you did too!
This week, I finished a project that I started last year - DIY whisper phones!
I was inspired by Mrs. Saoud's tutorial, but I made a few tweaks along the way!
  • When you pick out your 1/2" PVC pipe at the store, you'll want to ask a worker to cut it into 4.5" pieces unless you have someone at home who can do this. When I asked the Home Depot guy, he literally laughed in my face and said he'd only cut it into 2 pieces. However, I did not give up! I persisted, he got his manager, and his manager happily cut the PVC pipe! Lesson to you - perservere! :)
  • I bought 1/2" elbows and I was just able to shove them onto the pipe. Just make sure you buy 1/2" PVC elbows - they will be white, not beige. No gluing necessary!  That PVC glue smells really bad, so you're welcome. 
  • I spray-painted them with special spray paint for plastic stuff. It's Rust-Oleum Plastic spray paint. I don't know if this was really necessary... but it worked for me.
You can use these whisper phones during Read to Self for Daily Five, or for independent reading regardless of your classroom. You will have to teach them how to use them appropriately, otherwise they will scream into them or make them into a long telephone game..... not that this happened to me or anything. :)

My class last year loved these things. It really helped them focus on their reading and block out the outside distractions. It can be hard in my class to focus when I'm teaching half of the class and half are engaged in independent activities. So this was a big help! And the kids would ask to use them, which was great!

Also - if you want to save some money, you don't need to spray paint. I didn't paint mine last year and no one seemed to mind. :)
If you've been thinking of buying commercially-made whisper phones, this DIY alternative will save you a TON of money! And they are super durable!

Monday, July 9, 2012

Monday Made It: Mr. Spacer

Another week! Happy happy Monday. :)
This week I went with a super simple Monday Made It, but one that will be very useful next year! I introduce to you............. Mr. Spacer!
I first heard about Mr. Spacer from Hadar and he has been pinned for a long while. Mr. Spacer is used to help your students leave appropriate spaces between words! Lots of my students last year could have used this, but I can think of one student in particular who I wish I would have had this for! His handwriting is pretty messy, and a lot of the time I couldn't tell which letters he was making, let alone where one word ended and another began. I will have him again next year so I am excited to see how his work will change with the help of Mr. Spacer! 

To make Mr. Spacers, you'll need popsicle sticks, googly eyes, and Mod Podge. I got my popsicle sticks and googlies from Hobby Lobby. The popsicle sticks are regular sized and the googly eyes are 4 mm. So tiny!
All you have to do is Mod Podge two little eyeballs on top of each stick! I used a Q-tip to apply the Mod Podge and then just tossed it. That worked perfectly.

These can also be used as pointers or trackers to support one-to-one correspondence in reading. I think I'll have these out in baskets on the students' tables so they can use them when they need to. :)

Monday, July 2, 2012

Monday Made It: Cloth Erasers!

Hi friends! Happy Monday Made It!
This weekend, I made some cloth erasers for my student chalkboards that I have in my room. These could also be used for student whiteboards if you have those instead (which you probably do...). I've heard of other people using socks to erase or other cloths, but I didn't have any of those, so I made these instead! They are based on the directions I found at maya*made.
If you can use a sewing machine at all, you can make these in a snap! Here's how you do it.

First, you will need to get some cotton batting. This can be found in the bolts at any fabric store. I bought a yard, which will make about 27 erasers. Once you have your cotton batting, cut rectangles that are 5 inches by 10 inches.

Next, take one rectangle and fold it like so:
Then, you will sew all the way around it. Sew about 1/4" in from the edges. It's really not that big of a deal if it's not perfect, just remember... it is an eraser. :)
After that, sew parallel lines. Make as many as you want to, as far apart or as close as you want to. If you are a Type A sort of personality, yours will look much more perfect and beautiful than mine. I"m cool with that. :)
Then that's it! The original directions said to use pinking shears and cut all the way around. That does make it cuter ... but my border around isn't really thick enough.

So here is a little pile of them! They all look different, just like snowflakes!!
Each eraser took me about 3 minutes to make. Just sew, sew, sew! My sewing machine skills are like... first grade level (if first graders use sewing machines), so if I can do it, so can you!

I made some of these last summer for my class and the kids LOVED THEM. Absolutely 100%. They are really cute and they erase well. And if you use them for dry erase markers, just throw them in the wash after a while.

And I leave you with a little funny today:
Haha! Have a good week!

Monday, June 25, 2012

Monday Made It: Pocket Chart Stand

I'm so happy for Monday Made It because it makes Monday so much more wonderful!
This week, I made a mini pocket chart stand for my $1 pocket charts I got last summer at Target. I was inspired by Carly at First Grade Fabulosity's post about her pocket charts!
It was crazy easy! Here is how you do it!

First, you'll need to gather your supplies:
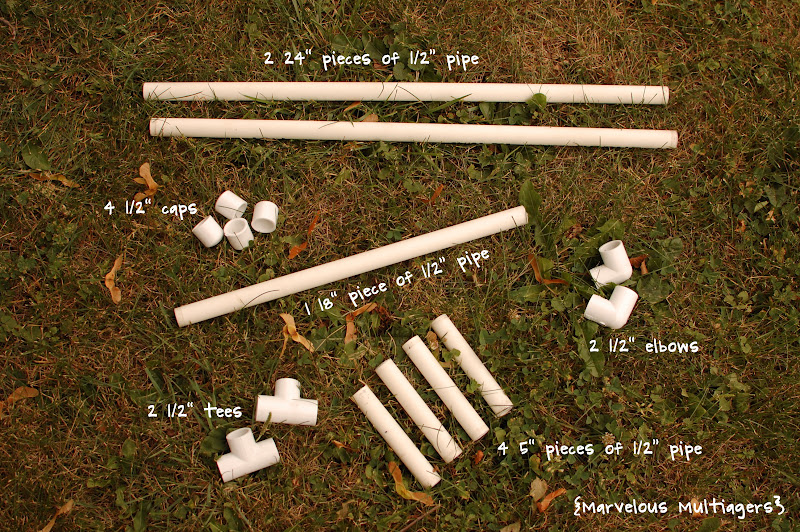
Side note: my pipe is already cut in this picture, obvi. You will need to buy a 10' piece of 1/2" PVC pipe at your preferred hardware store. :) It will cost you about $1.50 for the 10' pipe.

Then, start putting it together!

First, put your two elbows on either side of your 18" piece. This will be the top of your stand.
Then, put your 24" pieces in the other ends of the elbows. Just shove 'em in there!
After that, put your tees on ends of your 24" pieces.
Next, put one 5" piece in each tee opening.
Last, put your little caps on the open ends!
Then it should look like this bad boy. Feel free to relax at this point, as that is what I am clearly doing in this picture, haha!
Now if you would like to, you can spray paint your stand. I had some spray paint already so we painted it navy blue! Also, I have metal rings that I am going to use to hang the pocket charts but they are at school, so for the purpose of this post, I just tied the pocket charts up with yarn!
If you already have the pocket charts, this project will cost you less than $5 to make one stand. That is a pretty good deal to me!!!

There are two pocket charts back to back on the stand so two students can use the chart simultaneously!

I'm planning to use this as a station during reading time. Our first grade program features 3-4 word families per unit, so I'm going to make up little cards so they can make words independently using the word families.

Do you have any other ideas or ways we can use this awesome stand during independent work time?

Monday, June 18, 2012

Monday Made It: Contraction Shakers!

Happy Monday! Today marks the first day of my sailing lessons!!! I hope I don't regret this adventure... I'll let you all know tomorrow. :)

Time for Monday Made It, yeah!
Here is what I made this week: contraction shakers!!!!!!!!
This idea has been cooking in my brain for a while, and I had the empty bottle collection to prove it. :) A while back, Denise at Sunny Days in Second Grade posted about her synonym shakers, and I was totally in love with them! I knew my class would for sure love them, too.

Our reading series puts a TON of emphasis on contractions, and for some reason my class was really into them this past year, so I decided to make contraction shakers!

And you can make them, too!! I put my word lists and labels into a little document-o for ya.

When I looked up the Common Core standard for this activity, I noticed that it did not exist in the first grade set. So, question for you today: in which grade does your school teach contractions?

I teach one set of contractions in first grade in the fall and then the other set in the spring.

How about you?

Monday, June 11, 2012

Monday Made It: Mod Podge Paint Cans!

First of all, OMG! I almost had a heart attack watching The Bachelorette. I don't know if west coast people watch it later so I won't say anything, but I definitely shed a happy tear today during one of the dates, and before she gave out the last rose, I was feeling very anxious!!! But I'm happy now, all is well, and I can keep watching. :)

Second, I am participating in Monday Made It hosted by Tara at 4th Grade Frolics!
This is a really big deal for me, people. I am a visionary.... I get visions of things I want and that is pretty much where it ends. Haha! So I am really proud of myself for actually following through on a thing I wanted to do!

Here is my finished product!
I was inspired by Natalie's post about her paint cans!

This was my first ever Mod Podge project! I feel like that is crazy talk in the blogging world. I am trying not to care that there are some wrinkles in the paper and that it doesn't look perfect........... :) I'm sure I will get better with more Mod Podge practice!

I am going to use it to hold these bad boys:
They are the little rubbery things that come on Target prescription bottles! My mom had been saving them for me and I had like 4, and then I was able to go through a retiring teacher's stash over the weekend and she had TONS! I am going to use them as counters.

Last, over the weekend I picked up The Phonics Dance book!
I actually have an older version... it is well-loved. :)

I spent the afternoon lining up the hunks and chunks in The Phonics Dance with the order that I teach them in my reading program. I think this will make a HUGE difference for my students this year and I can't wait to do it!

Sunday, February 19, 2012

Love Jar

I realize that Valentine's Day has come and gone, but I am a slowpoke and just finished my Valentine's Day gift for my boyfriend today!

Before I begin, let me just say that I am really interested in crafting. I am interested in ideas and buying all the things I will need. I am also interested in beginning projects. After that... not so much. My cousins, Kelley and Lisa, can attest to this. I have so much stuff sitting around that I NEEDED for whatever reason. Sigh.

But I actually finished something, so go me!


This is the love jar! I wrote out 30ish nice things about my boyfriend, printed them out, and folded little fortune cookies to house them. I got this idea from Chrissy and then when I looked up "love jars" on Google, I saw the fortune cookies and I just HAD to do it. I have had all the stuff for a week and just now I did it. Story of my life.

I sort of followed the directions I found at Better Way Moms but I am way more lazy than that person so I adapted the directions to fit my needs and maybe yours! I made my own step by step pictures if you are interested!

1. I traced my circles. I used 12x12 scrapbook paper. I used a CD to make 2 big circles on each paper and then I used a cup to trace 4-5 small circles which were about 3.25 inches in diameter. 

2. Then I ripped off a strip of double-sided tape. No specific size... I sort of used the premarked lines on the tape to guide me but I was not religious about this. I cut it in half lengthwise. In the picture you can see that I put the two pieces of tape on the top part of the wrong side of the circle. I folded one of my little messages in half and laid it in there.

3. I had the sticky side and unsticky side meet. I did not crease at all.

4. Then, like so, I held two fingers on either side and just shoved the middle in. Other places told me to make a crease so I could tell where the middle was. I just winged it (wung it?). I think the imperfections will make it special.... haha.

5. Then you will have a little fortune cookie! This one actually looks pretty good but believe me, most of them were off centered and one side was bigger than the other. Whatevs.
 6. However, it will not stay fortune cookie-like unless you stick it together. I tore off a tinier piece of double-sided tape and stuck it close to the fold on the bottom part. I don't think you can see it in this picture. But it is there!
 7. Then I held it together. I didn't crunch it or crush it together... I just held it together and looked at Pinterest for a minute. Haha!

And that's it!! It was actually pretty easy and semi-fun once I got started. You could use this for many purposes! Birthday gifts, anniversary, you know.
So far they are sticking together... nothing is popping apart or anything! Good old double-sided tape. If you choose to do this, you might want to cut some practice ones. My brother and I played around with them and I got super frustrated for a while when they didn't look perfect. Then I let go and now I am happy!
Related Posts Plugin for WordPress, Blogger...